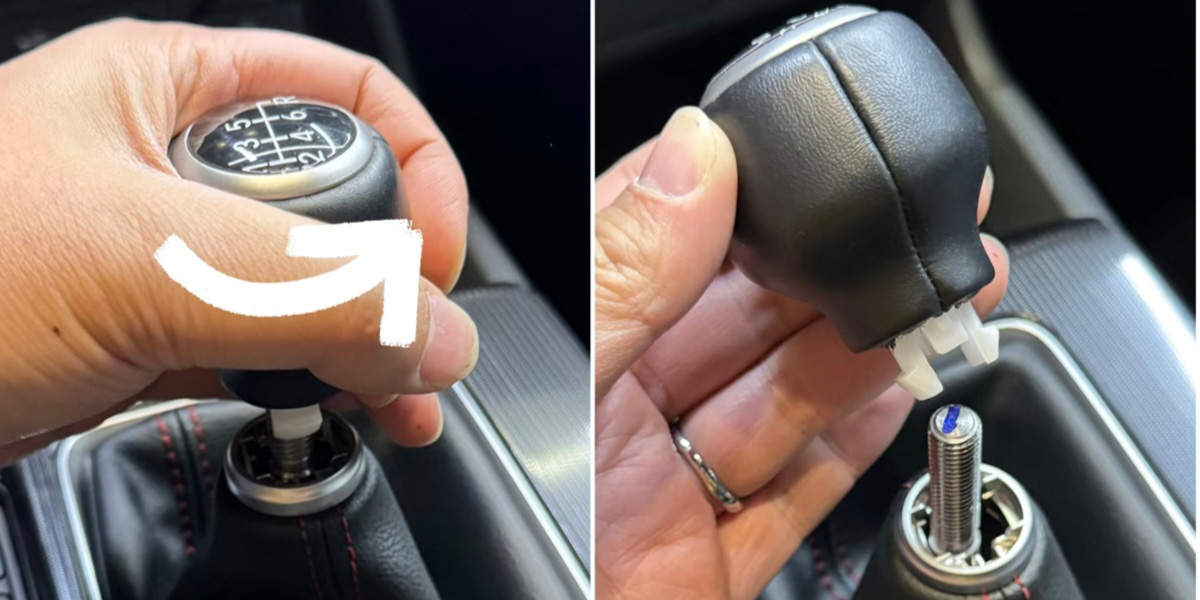
How to Remove Gear Shift Knob: A Comprehensive Guide for Different Vehicle Types

Removing a gear shift knob might seem like a simple task, but the method varies significantly depending on your vehicle’s make, model, and transmission type. Whether you’re installing an aftermarket shift knob, performing maintenance, or replacing a worn component, understanding the proper removal technique is crucial to avoid damage to your shifter assembly.

How to remove gear shift knob honda

Why Remove Your Gear Shift Knob?

There are several reasons why you might need to remove your gear shift knob:

  • Upgrading to an aftermarket knob for better ergonomics or aesthetics.
  • Replacing a damaged or worn knob that has become loose or cracked.
  • Accessing shifter components for maintenance or repair.
  • Installing shift boot covers or trim modifications.
  • Cleaning the shifter assembly thoroughly.

Essential Preparation and Safety

Before attempting to remove any gear shift knob, follow these safety precautions:

  • Engage the emergency brake to prevent accidental vehicle movement.
  • Shift to neutral (manual) or park (automatic) position.
  • Turn off the engine and remove the key.
  • Gather necessary tools based on your vehicle type.
  • Wear safety glasses when using tools that might cause debris to fly.

Different Removal Methods by Vehicle Type

Method 1: Threaded Removal (Most Common)

This is the most straightforward method used in many vehicles. Tools needed: None or basic hand strength.

Steps

  • Locate the shift knob base where it connects to the shifter.
  • Turn the knob counterclockwise while pulling gently upward.
  • Continue rotating until the knob completely unscrews.
  • Some knobs may require 15-20 turns due to fine threading.
  • Note: Some vehicles have clockwise threading, so if counterclockwise doesn’t work, try turning clockwise

Method 2: Set Screw Removal

Common in aftermarket installations and some OEM applications. Tools needed: Allen wrench set, small screwdriver.

Steps

  • Look for small set screws on the knob’s base or sides.
  • Use the appropriate Allen wrench to remove the set screw(s).
  • Pull the knob straight up once the screw is removed.
  • Keep track of small screws to avoid losing them.

Method 3: Clip/Snap Ring Removal

Used in some automatic transmissions and specific models. Tools needed: Snap ring pliers, small flathead screwdriver.

Steps

  • Remove any button or cap on top of the knob.
  • Look for a C-clip or snap ring visible inside.
  • Use snap ring pliers to carefully remove the clip.
  • Pull the knob upward – it may be seated tightly.
  • Safety warning: Keep one hand ready to catch the spring-steel snap ring as it can “take flight” when removed.

Method 4: Clip/Snap Ring Removal

Found in many modern vehicles with complex shifter designs. Tools needed: Small flathead screwdriver, trim removal tools

Steps

  • Remove the trim around the shift boot if necessary.
  • Locate plastic tabs or clips holding the knob to the boot.
  • Carefully pry tabs outward using a small screwdriver.
  • Work around all tabs (usually 4) until the collar releases.
  • Pull the knob assembly away from the shifter.

Method 5: Hammer and Wrench Technique (Stubborn Knobs)

For extremely tight or corroded knobs, particularly in older vehicles. Tools needed: Adjustable wrench, rubber mallet, protective cloth.

Steps

  • Wrap the shifter shaft with protective cloth.
  • Position an adjustable wrench under the knob.
  • Strike the wrench upward with a rubber mallet.
  • Use steady, controlled strikes rather than excessive force.
  • Warning: This method carries risk of damage and should be used only when other methods fail.

Measuring for Replacement

After successful removal, measure the shifter shaft for replacement compatibility:

  • External diameter of the shifter shaft.
  • Thread pitch (if threaded).
  • Length of threaded portion.
  • Any special features like reverse lockout mechanisms.

Common thread specifications include:

  • M8 x 1.25mm
  • M10 x 1.5mm
  • M12 x 1.25mm

Buy the appropriate custom gear knob and adapter, according to your vehicle model. (Shift Knob Thread Fitment Chart)

Professional Tips

  1. Document the process with photos before disassembly.
  2. Work in good lighting to see small components clearly.
  3. Have replacement parts ready if the original knob is worn.
  4. Test fit new knobs before final installation.
  5. Clean the shifter shaft before installing replacement knobs.
Free Worldwide shipping

On all orders for all orders

Easy 30 days returns

30 days money back guarantee

International Warranty

Offered in the country of usage

100% Secure Checkout

PayPal / MasterCard / Visa